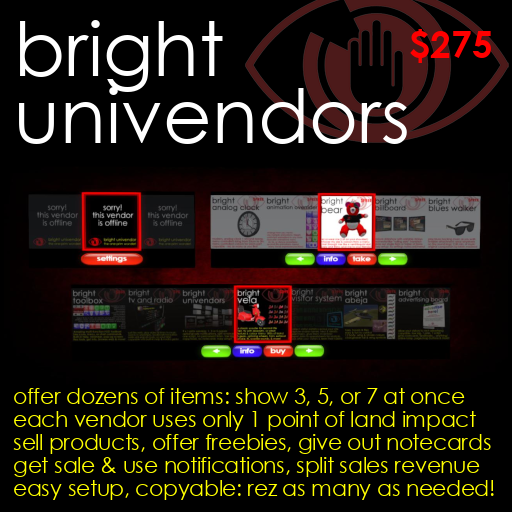
Scrolling multiproduct vendors with 3, 5, or 7 panels: one point of land impact!
Bright Univendors are the perfect way to sell your products, or give out freebies!
Each Univendor has a land impact of one. So whether you are selling from your own land, or a prim-limited rented shop, you can squeeze every drop of use out of your space. And each contains only one script, to minimising lag and memory use.
There are three models, showing three, five, or seven products at a time, on both sides of the vendor: but each vendor can offer dozens of products, by allowing customers to scroll through your range.
The vendor will show an image of each product, and if you have a notecard describing a product, it can give these out too.
You can also choose to receive an IM notifying you each time you make a sale.
And if you wish, you can send a percentage of each sale to another avatar, allowing you to split the proceeds with a business partner.
Amazing value, one land impact, single-script, multi-product, scrolling multipanel vendors, with sales notifications, and revenue splits...
Bright Univendors are the perfect way to turn your creativity into profit!
Drag the box "Bright Univendors boxed" from your Inventory onto the ground to rez it, right-click and select "Open", and at the bottom of the contents window which appears click "Copy To Inventory". Then open your Inventory, and find the folder "Bright Univendors boxed". Inside, you will find three vendors:
Bright Univendor - 3 panel
Bright Univendor - 5 panel
Bright Univendor - 7 panel
1. Choose a vendor and drag it from your Inventory onto the ground to rez it.
2. Right-click the vendor and click "Open": a "Contents" window will appear.
3. Drag each item you wish to sell from your Inventory into the vendor's Contents window. You must have copy and transfer rights.
4. Add a texture, called "(item name)/L$(price)": eg. if you are selling an item called "Hat" for L$10, add a texture carrying a picture of it called "Hat/L$10" (case sensitive).
5. If you wish, add a notecard, called "(item name)/note": eg. "Hat/note" (case sensitive).
6. Optionally, add a notecard called "Information" (case sensitive), which will be act as a notecard for any item which wasn't given it's own specific notecard in step 5.
Having loaded your vendor, click it to display its configuration menu.
Panel Width: 100cm
Floating Text: NONE
Side Panels: LOW SHADE, LOW SHINE
Sound Effects: ON
Shuffle Items: EVERY 30 SECONDS
Revenue Split: NONE
Sale Notifications: ON

Click below to change settings, or go ONLINE...

[ONLINE]
[Bigger] [Smaller] [Text]
[Shade] [Shine] [Sound]
[Shuffle] [Split] [Notify]
All the buttons after ONLINE change the vendors settings:
Bigger/Smaller: Click these buttons to change the size of the product panels in the vendor. They can be 20cm, 40cm, 60cm, 80cm, 1m, 1.5m, 2m, 3m, 4m, 5m, 7m, or 9m wide. The entire vendor will be scaled to accomodate them. (A seven panel vendor with 9m wide panels will be a vast 63m across - but still only have one point of land impact.)
Text: Click here to enable or disable floating text showing product names and prices. Text can be white, yellow, green, blue, or black - or it can be disabled entirely.
Shade/Shine: Each vendor shows a single product in the framed, centre panel, with other products to either side. The side panels can optionally be shaded or darkened to give more prominence to the centre panel, and given a slight shine as if under glass. Click the Shade and Shine buttons to adjust the level of shading and shininess applied to the side panels: each can be off, low, medium, or high.
Sound: Click here to turn the sound effects on and off.
Shuffle: The vendor can periodically scroll the product display to move random products to the framed centre panel. Click Shuffle to change the interval between shuffles. Options are 30, 60, 300, and 600 seconds, or to disabling shuffling.
Split: Click this button if you would like to split your sales receipts with another person - see below.
Notify: The vendor can send you an IM whenever it makes a sale: click here to turn this on and off.
Once you have loaded and configured your vendor, click the vendor to display its menu, and click the ONLINE button.
If you have made any mistakes while loading the vendor - for instance, if you have loaded a product for sale which has no corresponding product texture - the vendor will explain these. Load or rename items as necessary and try again.
But if all is well, you will be asked to grant "debit" permissions, which will allow the vendor to return mispayments (eg. payments for the wrong amount), or pay revenue splits if you have enabled them. Grant the permissions, and the vendor will go online.
If you wish to send a percentage of each payment you receive to another person, click the Split button in the menu described above.
The following window will pop up:
Click [Ignore] to leave split unchanged.

Leave blank & click [Submit] to clear split.

Enter UUID of recipient, '=', and a percentage,
then click [Submit], to split. eg. for 25% to
Shan Bright, enter...

4b16ad11-0a56-4627-8eb6-4c88a9850fb5=25

[                                ]
Every avatar in Second Life has a 36 character UUID or "key". Just enter the key of the person you wish to split your takings with, followed by an "=" sign, and their percentage.
When you click "Split", the vendor will report, in chat, the keys of all the avatars in the region. If you don't know your friend's key, just make sure they are in the area when you set up the split, and their key will be included in the list.
Please bear in mind that to make sure they always receive at least the promised percentage, the number of Lindens sent to them will always be rounded *up*. So for instance, if you promise them 10%, and sell an item for L$5, they will receive L$1.
Your partner will also receive copies of sales notifications if you have enabled them.
To end and remove an existing split, just leave the text box empty, and click Submit.
* When you are creating textures showing off your products, consider adding the product name and price to each texture. While the Univendor can show product names and prices in floating text, and will report them when "info" is clicked, being able to see them in the pictures will encourage interest in what you have to sell.
* Consider creating notecards describing your products. The Univendor has an "info" button, which will tell a user the name and price of the product in the centre frame. If you have loaded the vendor with a notecard for the product, it will give this out too when "info" is clicked. Potential customers will be encouraged if they can read about your product in detail, and learn of its features and benefits, before they buy.
* Many malls, sandboxes, and other Second Life venues offer a range of shop spaces for rent, and the rental cost is usually proportional to the number of prims they allow you to rez. Take advantage of cheap spots with small prim limits, as a Univendor can sell dozens of products while only taking a single point of land impact.
* Remember that the Univendors can also give out freebies! If you wish to offer free gifts, load them into a Univendor and let people scroll through them at their leisure. Offering free gifts attracts visitors, and helps build a relationship with them.
Shan Bright
Chief Executive Officer