Garrote for breathplay and execution roleplay, with sexual animations.
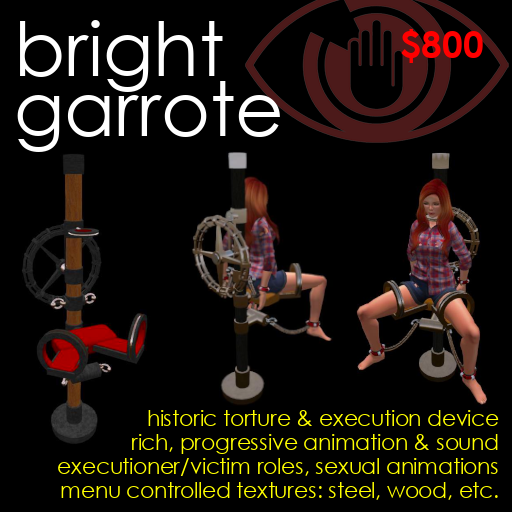
The Bright Garrote brings this famous, historical engine of torture and execution into Second Life: for scene dressing, and adult roleplay.
A heavy, two metre pole supports a seat into which a victim is chained hand and foot, a heavy collar about their neck. A large wheel behind them may be turned to tighten the collar in stages, restricting breathing, and eventually - if turned that far - extinguishing life.
Dark and imposing in design, the garrote is perfect scene dressing for a dungeon or torture chamber, and its menu driven texturing system allows its appearance to be changed instantly: to a modern, cold-steel machine, a mediaeval device of wood and leather, a clean, clinical, metal and glass construction for contemporary execution chambers, and many more.
Anyone may operate the machine alone, or roleplay with someone else acting as executioner: turning the wheel, and taking advantage of the helpless victim through a range of sexual animations. They may sit in their lap, kiss, embrace, or perform oral sex, or intercourse. The executioner may also just stand or sit to supervise, pace, or even cruelly mock their victim by dancing.
The garrote animates the victim in stages: sitting awaiting their fate, initial shock as the collar bites, increasing levels of frantic struggle as it tightens, slower movement as consciousness fades, before - if the wheel is turned so far - a motionless loss of life.
Not only does the victim's body react, their facial expression changes in line with their desperation to breathe: from anger, through open-mouthed panic, to final moments when the tongue is forced to protrude by the pressure of the collar.
These animations are accompanied by optional choking sound effects, varying in volume as the execution progresses, plus the rattling of the victim's chains, and the clicking of the ratcheted wheel.
Whether operated by victim alone, or by an executioner, the wheel may be turned stage by stage, or "automatic" execution may be selected, causing the garrote to progress through the stages, without intervention, after random time intervals.
The garrote is copyable, so an entire line of them may be erected. Many may play together, and they can even be centrally controlled, allowing a single executioner to inflict mass torture or execution.
Optionally, floating text may be shown above each garrote showing the stage of execution, and - if an automated process has been started - how long it has been running. Also optionally, when automated executions are complete, the time they took may be announced, making possible a macabre "race".
The garrote can be rezzed and used "as is", but is highly configurable for those who wish to customise it. Any animation or sound effect may be replaced, automated stage periods may be modified, new stages may be added, and animations may be added to the excutioners menus of poses and sexual acts.
The Bright Garrote is a very dark, but very fun, toy. Whether you wish to enjoy consensual roleplay, or are simply looking for horror genre dressing for your gothic castle... it'll take your breath away.
To unpack, find the object "Bright Garrote boxed" in your inventory, drag it to the ground to rez it, right-click and select "Open" to show its content window, and click the "Copy To Inventory" button at the bottom.
This will create a new folder in your inventory, also called "Bright Garrote boxed", and containing the following:
    Bright Garrote
    Bright Garrote note
Drag the Bright Garrote onto the ground to rez it, and it is ready for use.
Anyone using the Bright Garrote may personally adjust their position, or the height and size of the collar, to suit their avatar.
If they use the same garrote again, the settings they chose will be automatically reapplied, so they only have to go through the process of choosing those settings once for each garrote.
However, if they use a different garrote - because, for instance, you have rezzed more than one - they will have to choose their settings again.
If you enable the "Bright Experience" on your parcel of land, though, then any Bright Garrote on that land will be able to read the settings they chose on any other.
So it is entirely up to you. The garrote is perfectly usable without access to the Bright Experience on your land. But if you have rezzed many of them, or if your visitors might also be using Bright Garrotes in other venues, then they may find this helpful.
To enable the Bright Experience, stand on your parcel, open its "About Land" window, click the "Experiences" tab, click "Add", and enter the name "Bright Experience" when prompted.
Wear cuffs - and encourage your visitors to do the same!
The garrote restrains its victims by running chains to cuffs on their wrists and ankles - and these chains make it look far more effective.
Your cuffs must be "LockGuard" compatible. Most SL cuffs, and many SL BDSM toys, speak LockGuard: and if you are wearing cuffs when you sit on such a toy, it will automatically generate chains binding your cuffs.
If you already have your own favourite cuffs, wear them before sitting on the garrote. If they support LockGuard, chains will appear.
If no chains appear, or if you have no cuffs, stand, and click the garrote. You will see the following menu:
    To use this garrote:
    1. Wear wrist & ankle cuffs if you are victim.
    2. Right-click garrote and 'GET ON!'.

    Any LockGuard compatible cuffs will work.
    Most SL cuffs support LockGuard.
    Wear your own cuffs if you have them.
    Click [CUFFS] for a free set if you don't.

    [CUFFS] [OK]
Click [CUFFS] and you will be offered a "Bright Cuffs" folder containing LockGuard compatible wrist and ankle cuffs. Accept it, find it in your inventory, right-click, and select "Wear Items".
The cuffs will appear on your body, and you may edit and adjust them as you would any Second Life attachment.
The cuffs are yours to keep, and also in the folder you will find a manual describing them in more detail. Many Second Life BDSM toys also support the LockGuard system, and if you are wearing these cuffs when you sit on such a toy, it will automatically create chains running to your wrists and ankles.
Right-click the garrote to display its pop-up menu, and select "GET ON!". The following menu will appear:
    [VICTIM] Be victim
    [EXEC] Be executioner

    [VICTIM] [EXEC]
Click [VICTIM]. You will be seated, and see the following message in chat:
    PLEASE WEAR WRIST & ANKLE CUFFS!

    CLICK GARROTE FOR MENU:
    Click [CUFFS] for free set if you don't have them.
    Click [POSITION] to adjust your avatar position.
    Click [COLLAR] to adjust collar position.
Click the garrote for its menu:
    Victim: Jonny Morgan
    Execution Stage: (Preparatory)
    [TIGHTEN] Tighten the collar
    [AUTO] Start autoexecution
    [CONTROL ALL] Control all garrotes on parcel
    [POSITION] Adjust avatar position
    [COLLAR] Adjust collar position
    [CUFFS] Receive free cuffs

    [TIGHTEN] [AUTO] [CONTROL ALL]
    [POSITION] [COLLAR] [CUFFS]
Avatars vary in size, and so you may find that you are not positioned perfectly, or that the garrote's collar is not at the right height for your neck.
To adjust your position, click the [POSITION] button on the menu. You will see this menu appear:
    Change your horizontal or vertical position.

    [+5cm Vert]
    [-5cm Vert] [NORMAL] [<BACK]
    [+1cm Vert] [+5cm Hor] [+1cm Hor]
    [-1cm Vert] [-5cm Hor] [-1cm Hor]
Click the +/- "Vert" buttons to move yourself up and down vertically, and the +/- "Hor" buttons to move yourself forward or back horizontally. Try to position yourself so that your bottom is buried into the seat, but not sticking through it.
If you get into trouble, click [NORMAL] to move yourself back to your starting position, and try again. When you are happy with your position, click [<BACK] to return to the main menu.
Click the [COLLAR] button on the main menu to adjust the position of the garrotes collar. The following menu will appear:
    Change collar height in cm.
    Change size in percent.
    Click [DEFAULT] to reset collar.

    [+5cm]
    [+1cm] [-5cm] [-1cm]
    [+5%] [+1%] [DEFAULT]
    [-5%] [-1%] [<BACK]
Click the +/- "cm" buttons to move your collar up and down, and the +/- "%" buttons to make it bigger or smaller. Try to adjust it so that it surrounds the bottom of your neck, and is visible all the way around.
If you get into difficulty, click [DEFAULT] to return the collar to its original height and size, and try again. When the collar is positioned correctly, click [<BACK] to return to the main menu.
Note that you will only have to do this once! The Bright Garrote will remember your preferences, and when you sit on it again, it will automatically adjust your position, and the height and size of your collar, to the values you have chosen.
(And if you have enabled the "Bright Experience" on your land, these same settings will be applied automatically when you sit on any Bright Garrote on any land where the experience is also enabled.)
Click the [TIGHTEN] button on the main menu to tighten the collar. Your avatar will begin to struggle, and their face will show panic and anger. You will hear the ratcheting sound of the wheel turning, of yourself choking, and the rattle of your chains.
Now click the garrote to display the menu again.
    Victim: Jonny Morgan
    Execution Stage: 1/4 Initial
    [TIGHTEN] Tighten the collar
    [LOOSEN] Loosen the collar
    [AUTO] Start autoexecution
    [RESTART] Restart execution
    ...
Note the "Execution Stage" at the top of the menu. It says "1/4 Initial". You are at stage 1 of 4 stages. [TIGHTEN] will always take you to the next stage, and [LOOSEN] will always take you back a stage.
You will struggle more frantically in stage 2, and even more in stage 3. In the final stage 4, you will be physically fading, struggling less energetically, and your tongue will be protruding from your mouth. If you are on stage 4 and you click [TIGHTEN], you will complete the execution, and your avatar will fall silent and motionless.
Click [AUTO] if you wish to go through the remaining stages automatically, without further intervention. The next stage will begin immediately, and will run for a random time period between 10 and 30 seconds. Then the next will begin, and so on. If you have enabled the "FinalReports" option in the settings notecard (see below) the total time taken to complete the stages will then be announced.
Click [RESTART] to return yourself to the original sitting pose you were in when you first got onto the garrote.
To act as executioner, right-click a garrote, and select "GET ON!" from the pop-up menu. If the garrote is already seating a victim, you will become their executioner automatically. If not, you will see the following menu:
    [VICTIM] Be victim
    [EXEC] Be executioner

    [VICTIM] [EXEC]
Click [EXEC]. You will see the following message in chat:
    CLICK GARROTE FOR MENU!

    Click [POSITION] to adjust your vertical position.
Click the garrote for its menu. Most of the option buttons you will see - [TIGHTEN], [LOOSEN], [RESTART], and [AUTO] and so forth - are described above. Note that the options which control the wheel will stop being available to the victim seated on the garrote when you become executioner. You are in control.
While you are executioner, you will be animated turning the wheel whenever you click [TIGHTEN] or [LOOSEN], or whenever an automated sequence changes to the next level.
There are two additional buttons on your menu: [ACTION] and [SEX].
Click [ACTION] for a menu of actions you may perform while executioner.
    Please choose an action.

    [(NONE)]
    [DANCE 1] [DANCE2] [DANCE 3]
    [MAST. (F)] [MAST. (M)] [PACE]
    [<BACK] [POSE] [SIT]
Click any action you choose, and your avatar will be animated appropriately until you click the garrote again to choose a new action - or click [(NONE)] to stop them.
Click [SEX] for a menu of sexual options with your victim:
    Please choose a sex act.

    [(NONE)] [-ANAL-] [-BLOW-]
    [-BLOWN-] [-CUDDLE-] [-FUCK (F)-]
    [-FUCK (M)-] [-KISS-] [-LAP-]
    [<BACK] [-LICK-] [MORE SEX>]
Choose any act, and your avatar will be animated having sex with the victim until you click the garrote again to redisplay this menu, and either choose a new sex act, or click [(NONE)] to stop.
Note the [MORE SEX>] button. You can click this repeatedly to cycle through the dozens of sexual animations available. The most commonly used are all on the first menu, but for variety, you will see alternative animations for the acts listed above on the subsequent pages.
You may have sex with your victim at any time. While you are having sex, you will not be animated turning the wheel, even if you click [TIGHTEN] or [LOOSEN] yourself.
A few settings are stored on a notecard inside the Bright Garrote.
Right-click the garrote, select "Open" from the pop-up menu to display its contents window, and double-click the "! SETTINGS" notecard. You will see the following:
    LoopChoking NO
    LoopChains YES
    FloatText NO
    ControlAll NO
    FinalReports NO
The "LoopChoking" and "LoopChains" settings determine whether the sound of choking, and the sound of chains, will be heard only briefly each time the collar is tightened, or be continuous. Set either or both to "YES" to loop these sounds.
The "FloatText" setting determines whether or not information about the progress of an execution should be shown in floating text above the garrote while a victim is seated on it. Set this to "YES" if you would like to display this information.
The "ControlAll" setting determines whether or not residents using the garrote will also be able to simultaneously control other garrotes belonging to you on the same parcel - and whether this garrote may itself be controlled from another. Set this to "YES" on a group of garrotes if you wish to make it possible for a single user to control the torture of execution of a number of residents at once.
The "FinalReports" setting determines whether or not a public message will be sent after an automated execution, announcing the name of the victim, and the time in seconds their execution took to complete. Set this to "YES" to enable such announcements.
When you have finished editing the notecard, click the "SAVE" button.
If you have enabled the "ControlAll" option in the settings notecard (see above), an button labelled "CONTROL ALL" will appear on your garrotes menu. Click it to display this menu:
    Please click to operate THIS garrote,
    OR ANY garrote on the parcel with
        a victim and remote control enabled.
    [TIGHTEN] Tighten the collar
    [LOOSEN] Loosen the collar
    [AUTO] Start autoexecution
    [RESTART] Restart execution

    [TIGHTEN!]
    [LOOSEN!] [AUTO!] [RESTART!]
Clicking any of these buttons will have an effect on the garrote you clicked, and any other garrotes on the same parcel of land which also belong to you, have the "ControlAll" option in their settings notecards enabled, and are also seating victims.
So if you are at stage 2, and you click [TIGHTEN!], not only will your garrote advance to stage 3, all the controlled garrotes will go to stage 3: regardless of what stage they were at before.
Similarly, if you are at stage 3, and click [LOOSEN!], then your garrote will revert to stage 2, and all the controlled garrotes will also go to stage 2, again regardless of what stage they were at before.
If you are at, say, stage 0, and you click [AUTO!], then your garrote - and all the other controlled garrotes - will advance to stage 1 immediately, and begin the automated sequence. However, the amount of time they spend in stage 1 before advancing to stage 2 will be calculated randomly for each individually, so they will not progress through the automated sequence at the same speed.
Finally, clicking [RESTART!] will revert all the controlled garrotes to stage 0.
Clicking the main seat prim of your garrote will display this menu:
    OWNER MENU

    [TEXTURES] Change the garrote textures
    [ALIGN] Align this garrote to the one nearest
    [CLEAR] Clear local user data (not experience data)

    2 user setting(s), 130929 bytes available

    [TEXTURES] [ALIGN] [CLEAR]
This menu will only appear for you: other residents will not have access.
Click the garrote seat to display the owner's menu (see above), and click [TEXTURES], to display this menu:
    TEXTURES MENU: Currently updating THIS toy.

    [THIS/ALL] Update THIS/ALL toys
    [PRESETS] Choose a preset style
    [MAIN] Change main surfaces
    [SOFT] Change soft surfaces
    [POLE] Change pole surfaces
    [JOINT] Change joint surfaces

    [<BACK]
    [THIS/ALL] [PRESETS] [MAIN]
    [SOFT] [POLE] [JOINT]
Click [THIS/ALL] to toggle between changing the textures of an individual garrote, and changing the textures of all the garrotes you have rezzed on the parcel.
Click [PRESETS] for a menu of preset texture themes, such as "Wood & Iron", "Rusty", "Cold Steel", and so on.
Click [MAIN], [SOFT], [POLE], or [JOINT], to change the main texture, the texture applied to the pole, the texture applied to the soft surfaces, or the texture applied to small metal joint parts, individually. You will be offered a choice of 40 different textures for each: so there are literally millions of possible combinations.
If you wish to place a series of garrotes in a line, you can of course do so manually and arrange them as you wish, but there is an automated feature which may make the process quicker.
Click the garrote seat to display the owner's menu (see above), and click [ALGIN].
The garrote will spend a few seconds scanning for the nearest other garrote within 10m, and when it finds it, it will automatically line up with it, exactly 1m to its left, or its right.
Each time someone sits on the garrote - as victim, or executioner - the garrote will save their preferred settings, including any changes they've made using the menus to their avatar position, or the collar height and size.
Click the garrote seat to display the owner's menu (see above), and you will see the following information at the bottom of the menu:
2 user setting(s), 130929 bytes available
The amount of space Second Life allows an object to use to store such settings is limited. In fact, each garrote can remember settings for hundreds of users, so unless your site is very busy, it might take years to use up the capacity, but in principle, it is possible that eventually new users will find that their settings aren't stored.
To fix this, click [CLEAR], and then [YES!] to confirm your choice. This will clear all the saved settings.
Note that if you have enabled the "Bright Experience" on your land (see above), then this will not mean that existing settings will be lost, because they will still be accessible from the experience itself. Second Life does not put a fixed limit on the amount of data an experience may store.
Please note, this section is ENTIRELY OPTIONAL!
The Bright Garrote will work as described above exactly as supplied.
This section is for technically minded Second Life residents who wish to customise their garrotes operation. If you don't care, or the jargon here means nothing to you, it is quite safe to ignore!
Many features of the Bright Garrote are controlled by the items stored inside, and the names given to them. By adding, removing, replacing, or renaming items, you can change how it works.
YOU DO THIS AT YOUR OWN RISK!
You CAN break your garrote this way. So please, before doing any of this, do make sure your original Bright Garrote is still in its box in your inventory.
1. Execution stages
The Bright Garrote will normally run through six stages in a complete execution: sitting waiting, four stages of animated struggle, and a final motionlessness. They are defined by these six animations:
    !VB, (Preparatory), SAD, 0, 0, 0, <2,0,50>, <0,0,0>
    !VB, 1/4 Initial, ANGER, 50, 10, 30, <2,0,50>, <0,0,0>
    !VB, 2/4 Midway, CRY, 75, 10, 30, <2,0,50>, <0,0,0>
    !VB, 3/4 Advanced, OPEN, 100, 10, 30, <2,0,50>, <0,0,0>
    !VB, 4/4 Final, TONGUE, 50, 10, 30, <2,0,50>, <0,0,0>
    !VB, Complete, NONE, 100, 0, 0, <2,0,50>, <0,0,0>
Each name is divided into 8 comma separated values:
    1. "!VB" - indicates a "Victim's Body" animation
    2. Stage description, eg. "1/4 Initial"
    3. Facial animation label, eg. "ANGER" (see below)
    4. Choking volume percentage, eg. "50"
    5. Minimum automated stage length in seconds, eg. "10"
    6. Maximum automated stage length in seconds, eg. "30"
    7. Victim sitting position (in cm), eg. "<2,0,50>"
    8. Victim rotation (in degrees), eg. "<0,0,0>"
Changing the names of these animations can change the related feature of the garrotes function. So for instance, changing the min and max stage lengths can change the amount of time alloted to a stage during an automated execution.
(We recommend *not* setting the minimum play time to less than 5 seconds. You need to allow time for the executioner to be animated turning the wheel and returning to a normal pose.)
Animations may be added or removed at you wish: each animation you add will add a new stage to the execution, and require one more [TIGHTEN] click to get through it. The alphabetic order they are sorted in is the order in which they will play.
The first animation is always played when the victim first sits on the garrote, and the last always indicates that the victim's execution is complete, and so should normally be a pose without movement.
2. Facial expressions
The facial expressions referenced in the animations listed above are also animation items:
    !VF, ANGER, express_anger_emote
    !VF, CRY, express_cry_emote
    ...(etc)
Each of these has three comma-separated values:
    1. "!VF" - indicates a "Victim's Face" animation
    2. Label, used as links in the stage anims above, eg "CRY"
    3. SL internal animation, eg. express_cry_emote
These animations should all loop, animating a Bento mesh head. Bento head animations will not have any effect on avatars with "system" heads, and so the garrote will also play the specified "SL internal" animation at the same time: most avatars faces should respond to either the Bento or SL internal animation.
Note that the SL internal animations only run for around 2 seconds, and so they are constantly replayed by the garrote to keep the expression as constant as possible.
3. Executioner actions and sex acts
When the executioner clicks the [ACTION] or [SEX] buttons on the garrote menu, a submenu is displayed showing option buttons read from animation names like these:
    !XA, (NONE), <-50,-50,20>, <0,0,0>
    !XA, DANCE 1, <150,-50,20>, <0,0,120>
    ...(etc)
    !XS, -ANAL-, <85,0,-45>, <0,140,0>
    !XS, -BLOW-, <70,0,8>, <0,0,180>
    ...(etc)
These each have four comma separated values:
    1. "!XA" for "eXecutioner Action", or "!XS" for "eXecutioner Sex"
    2. Button label - the text to show on the submenu button
    3. Executioner position, coordinates in cm
    4. Executioner rotation, coordinates in degrees
By changing these animation names, you may change the button label, position, or rotation of any of the these animations. You may also delete any you don't wish to see on the relevant menu, or add your own.
If there are too many to show on the relevant submenu, a "MORE>" button will appear automatically. The only limit on their number is the available script memory.
Note that dozens of sex animations are supplied with the garrote. What we judged to be the best of each type was given a button label surrounded by dashes ("-ANAL-") to move it to the top of the list, so that it would appear on the first submenu. After these, alternative animations were given button labels like "ANAL 2" and "ANAL 3", to appear on submenus available through clicking "MORE>".
4. Executioner wheel turning animations
As supplied, the Bright Garrote will play the following "!XW" ("eXecutioner Wheel") animations when turning the wheel to tighten, and then loosen, the collar:
    !XW, WHEEL1, <-90, 0, 20>, <0,0,0>
    !XW, WHEEL2, <-90, 0, 20>, <0,0,0>
Their names follow the same conventions as the names of the [ACTION] and [SEX] submenu animation names above, so you may modify them to adjust the executioners position, or replace them if you wish.
However, there must always be exactly two "!XW" animations: the first alphanetically will be used during tightening turns, the second during loosening.
5. Sounds
There are four sound items:
    $CHAINS
    $CHOKING
    $FINAL
    $WHEEL
$WHEEL is played once every time the wheel is turned.
$CHAINS and $CHOKING are played on a loop during the middle stages of an execution.
$FINAL is played once when the final stage is reached: it is a "last breath" sound.
Any of these may be replaced with any other fully permissioned sound item: full permissions being required to allow the script to read the sound items UUIDs, and pass them to other scripts to be played by other prims, as each prim may only play one looped sound at a time.
* Do enable the Bright Experience if you can! This will mean user settings are all safely stored independently of any single garrote object. If you ever change venues, and rez new Bright Garrotes, when your old visitors arrive at the new site, they'll find that the garrotes remember them, and apply their chosen settings. People like that!
* Add executioner [ACTION] submenu animations if you have some in your inventory that you like! Do you have an animation which will allow the executioner to walk in endless circles around the victim, or perch cross-legged on top of the pole like a mystic? Choose realism, choose humour, choose to mock your victims... whatever suits your venue and style of roleplay.
* We provided many [SEX] submenu animations to allow you as wide a choice as possible. Don't be afraid to delete those you just don't like, add your own, or change animation names so that your favourites appear on the first submenu!
* Even if you have customised garrotes in your inventory, keep the "Bright Garrote boxed" object! It is no mod, so it will always contain a Bright Garrote exactly as shipped from the factory, in case you ever need it.
Shan Bright
Chief Executive Officer